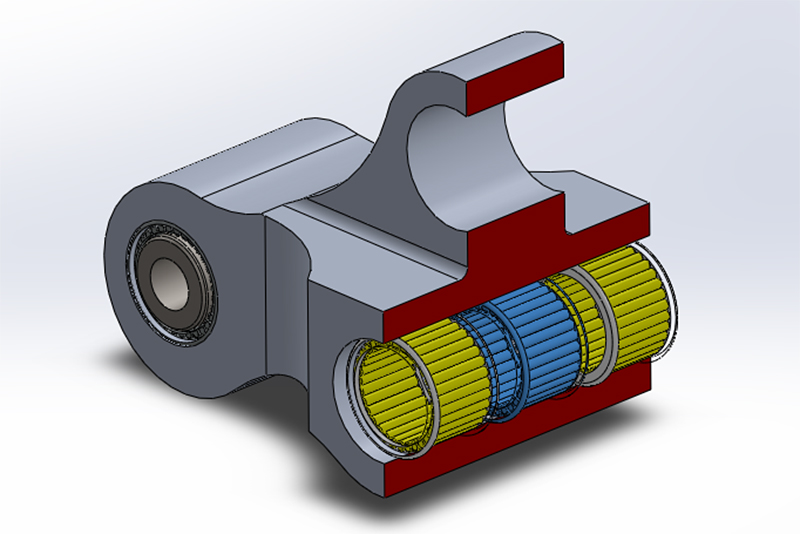
 Low down and in front of the rear wheel lives the suspension linkage assembly that connect the shock absorber to the swing-arm. Out of sight (and mind) it has a hard job to do in the constant onslaught of water and road grime. Eventually, the pins wear and the bearings rust away ……. so time to give a ten year old bike a spruce up with a linkage overhaul.
The original installed bearings are Torrington HK1816V and the seals are unnamed and use a metal case. With over 63K on the clock, only the seals really needed replacing as they were no longer supple. The bearings were cleaned and although the pins look worn, everything was measured and found to be within tolerance.
Here I’m using a complete kit of parts that was a group-buy back in November 2012, spearheaded by Brucaliffo from the Aprilia AF1 forum and AOTR. However, where possible I’ve listed parts and alternatives as it’s most likely that you dear reader, are going to need to source the parts yourself as the kits are currently unavailable. The ‘Bruc’ kit came with NRB full-complement bearings and INA seals. The bearings are slightly different than the original Torrington or the SKF equivalent, with slightly reduced static or dynamic load capacity. However, Torrington bearings are no longer available having been taken over by Koyo who use different codes (B-1816) and don’t have an online needle bearing catalog (As of January 2013). SKF bearings are readily available, but expensive. Where the NBR bearings win hands down however, is that the rollers are captive and can’t fall out, a real problem when fitting traditional full-complement bearings.

But enough of the tech waffle, on with the show ……
Quick links
| Parts | Tools | How to | Upgrades |
Parts
1x Pin (18mm Dia. x 25mm. Thru hole 10mm Dia). Aprilia part No: AP8135608 – This is the shock absorber lower mount.
1x Pin (18mm Dia. x 40mm. Thru hole 10mm Dia). Aprilia part No: AP8135924– This is where the linkage attaches to the frame.
2x Pins (18mm Dia. x 67.8mm. Thru hole 10mm Dia). Aprilia part No: AP8121315 – These are the bolts that attach the con-rods to the linkage and the swing-arm.
8x Seals (D 18 x 24 x 3). Aprilia Part No: AP8110068
7x (or 8*) Full complement needle bearings – HN1816. Aprilia part No: AP8110066 – These are NOT the same as normal needle-roller bearings. They contain many more rollers and have a higher static and dynamic load range. Unless you are sure the bearings you are buying are Torrington full complement – DO NOT USE HK1816 BEARINGS!
*Some Caponords and most (all?) Rally-Raids have 3 bearings in the swing-arm instead of two.
Tools
8mm Hex (Alan) key.
Spanners (wrenches) 13/15/17mm or sockets. However, in the case of the 15mm, if only sockets are available, it may be prudent to remove the left hand exhaust system for access to the rear conrod nut. Also a swivel drive will make access to the frame mount nut much easier as well. Personally, I preferred sockets so I could use a torque wrench to finish the job correctly.
Small screwdriver or pick to get the old seals out.
2x 17mm spanners or sockets for the removal/insertion tool (Brucaliffo kit only).
26mm socket for the rear axle.
How to
- Place the bike on its center stand or secure it in an upright position. IF THE BIKE IS NOT SECURED SAFELY IT COULD FALL ON YOU…….AND 250KG WILL UPSET YOUR DAY – YOU HAVE BEEN WARNED!
- If you do not have a 15mm spanner (wrench) you will be better off removing the left hand exhaust system to access the rear conrod nut by socket. Personally, I removed the system anyway as it made visibility and general working in the area more pleasant.
- Place a bar or something you can use as a lever under the rear wheel.
- Remove the 15mm nut from the rear conrod bolt.

- Remove the 15mm nut from the front conrod bolt – not strictly necessary, but makes life easier if you do not have a vice or clamp sufficiently large enough to hold the linkage assembly once removed form the bike.
- Use the lever under the wheel to raise the linkage and take the weight off the bolts – slide the rear conrod bolt out. The conrods will now drop down. THE SWING ARM/WHEEL ARE NOW UNSUPPORTED.

- Use a 17mm spanner/socket to remove the bolt from the bottom of the shock absorber.
- Use an 8mm hex key and 15mm spanner or socket with swivel (to clear rear brake master cylinder) to remove the frame bolt. Hold the linkage secure before withdrawing the bolt to prevent it falling. KEEP THE LINKAGE IN THE SAME ORIENTATION – IF YOU TURN IT ON ITS SIDE THE PINS AND BEARING ROLLERS CAN FALL OUT!

- Place the linkage on a bench and remove the front conrod bolt and place the conrods to one side.
- Remove the pins and use a small screwdriver or similar to lever the seals out of the block taking care not to mark the soft aluminium.


The next section is specific to the Brucaliffo supplied kit.
Linkage assembly
- There are two methods to removing the bearings.
-
-
- Use the supplied drift
- Use the supplied insertion tool with some minor additions – an old 17mm socket or suitable washers to fit over the end of the bearings and be pushed against.
-
I used the second method as it’s more sedate and less prone to accidentally damaging the soft block by a misjudged whack with a hammer! Using the supplied tool and spanners doesn’t need much force to remove the bearings. With about 150mm (6 inches) of leverage I was able to remove them by hand – the initial force to break the seal between the old bearing and the block is the worst ….. and a 10 year old could do it with ease!


- With all the bearings out, take time to thoroughly clean the block ready for the new
 bearings to be inserted.
 - Start with the frame and conrod bearings (2 in each).
- To insert a bearing, place it onto the insertion tool and place in position. Fit the other end of the insertion tool on the other end (maintains alignment and provides a surface to thrust against) followed by the washer and nut. Slowly tighten the nut against the bolt and watch carefully as the bearing slides into position. Make sure it is aligned correctly.
- The tool has a 3.6mm shoulder machined into it
 for the seal, so keep pulling the bearing into place until the tool seats against the block. Now remove the tool.
 - Repeat for the other three bearings. You should now have four bearing inserted – frame and conrod.
- The single shock absorber mount is slightly different. Using the tool to insert the bearing places it 2mm out of alignment. I used a suitable washer to space out the tool and nudged the bearing into place. See the pics in the
 gallery below of the misaligned bearing with the seals in place!
- With all the bearings in place, now install the seals. Insert them by hand with the four dimples facing outwards. Gentle but firm thumb pressure is all that is need ed to pop them into place.
- Pack the bearings and cavity with the supplied grease.
- Grease the pins and slide them into place.
- Fit the conrods to the block, making they are fitted the right way round (arrows towards the back wheel) and that the bolts are also inserted the right way round.


Swing arm bearings
-

Remove the 26mm rear axle nut and axle guide plate and allow the axle to move forward slightly – this will allow sufficient slack in the drive chain to work around.
- Remove the chain slider screw from the underside of the swing arm (4mm HEX).
- Carefully lever the old seals out.
- Using the same procedure as above – or the provided drift, remove the bearings. CHECK HOW MANY FIRST … YOU MAY HAVE 2 OR 3!

- Insert the bearings using the same method as above – pull the chain slider down for easier access. The plastic is very flexible.
- If you have a third bearing or wish to install one, should have a gap of approximately 23.5mm either side when correctly installed.
- Once all the bearings are in place, fit the seals and grease well before installing the pin.
- Refit the linkage: frame mount first, then shock absorber. Make sure you have torqued the shock absorber mount before you fit the conrods or you will not have access. Raise
 the rear wheel a small amount when refitting the conrod bolts.
 - Torque the nuts & bolt: Frame 45Nm / Shock absorber 40Nm / Conrod 45Nm.
- Re-secure the chain slider.
- Refit the axle guide plate and tighten the rear axle – 90Nm.
- Lastly, refit the exhaust, body work and seats if you removed them.


And you’re all done!!!


Upgrades
 Both swing arm and conrod end of the linkage are capable of holding a third bearing. To locate it correctly push the centre bearing in 25.5mm from the outer face of the block and measure from both sides to ensure it’s located centrally. After installing the two outer bearings you will have a gap of approximately 6.5mm between the centre and outer bearings.
Frame and conrod ends of the block can be drilled and fitted with grease nipples to make re-greasing easier. A 2mm pilot hole was drilled through, then a 5.5mm deep countersink tapped with an M6 thread. I 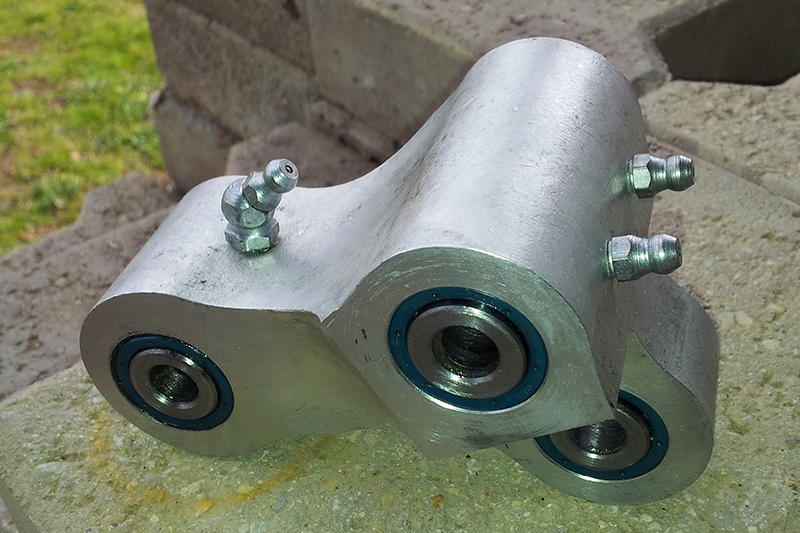 used an M6x45 for the frame end and two M6 straight fittings for the conrod end. This was done to ensure good grease flow between all three bearings.
The shock absorber mount would require the bearing case to also be drilled to use a grease nipple. Allegedly Torrington bearings where available pre-drilled at one time.


