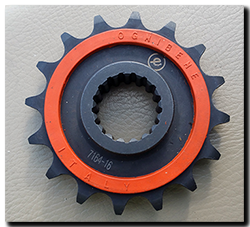
 The first Ognibene (7164-16) 16 tooth front sprocket was fitted last April, since then its done over 18,000 miles and I’m happy to say, still has some life left in it. In comparison to the excellent Renthal sprockets that I’d used since the OEM one wore out, I have to say I’m very impressed. Yes they cost a couple of pounds more that the Renthal, but it has covered more miles. The Reynolds typically averaged (15,000 miles), making the Ognibene’s running cost slightly better pence-per-mile wise.
Now a matching set of front and rear (8098-45) sprockets are going on, along with a nice new gold/gold DID 525-112 ZVM-X chain.  The France Equipment rear sprocket (1683-45) I fitted last year is still looking pretty good, so it’ll go on the shelf as a part-worn spare.
One thing that’s maybe worth mentioning about Ognibene sprockets is to be aware that the ‘silent’ bands will bed-in over the first few miles. Initially the chain side-plates ride up on the hard plastic bands before sinking in – changing the effective diameter of the chain’s run around the sprocket ……. this means your chain adjustment has to be monitored more carefully at the beginning  and will no doubt require a couple of tweaks. Once everything beds-in I guess it’s business-as-usual with regards to the long intervals between adjustments that I like about the DID chain.
New chain and rear Ognibene sprocket courtesy of Motrag at a very competative price. Unfortunately they could only supply the 17 tooth front, not the 16 tooth…… that may change in time.


